| Mac@Work The Ultimate Business Machine
MailServe improves on Postfix Enabler by adding Fetchmail and Virtual Alias Domains support, IPv6 over SSL for POP and IMAP, Real-time BlackLists, alternate port nos for SMTP, mail queue management, and allows a list of Smart Hosts to be stored.
DNS Enabler
DNS Enabler can set up a fully functional buzzword-compliant Domain Name Server on Mac OS X with just one click. It is able to handle multiple virtual domains, multiple sub-nets, aliases, MX records (including specifying back-up servers on other networks), multi-homing, and creating the right number of reverse pointer and CNAME records - all from one convenient single window.
WebMon helps you set up PHP, WebDAV, and SSL on OS X's built-in web server. For SSL, WebMon helps you generate test certs, as well as the certificate request needed to obtain a live cert. You can also use WebMon to monitor your web server logs remotely via remote login through SSH (the secure shell).
Luca
Luca is an accrual-based double-entry accounting system. Create unlimited levels for the Chart of Accounts. Real-time postings, Balance Sheet, and Profit & Loss reporting. Tracks receipts, disbursements, receivables, payables, and statement of accounts. Supports multiple currencies, calculates forex gain or loss. And more.
LDAP Enabler
Activate and configure the built-in LDAP server on Leopard with just one click. Once enabled, you can use the LDAP server to store contacts information that will show up on any Mac (and iPhone), and keep them all updated from one central point.
|
Postfix Enabler for Tiger & Panther What is Postfix Enabler? Postfix Enabler helps Mac users set up a totally-functional buzzword-compliant mail server in less than a minute, the Mac Way. It sets up SMTP, POP3 and IMAP services, with or without SSL support. It even sets up SSL test certs so that you can test the SSL connection. It enables SASL Authentication so you can connect to ISPs who require the SMTP connection to be authenticated. Or, the other way around, it allows you to turn on SMTP-AUTH on the server, so that you can authorise remote users who need to send mail through it. Plus, it has a few other features, including the ability to set up a roving SMTP server for PowerBook users to send mail wherever they are, whenever they want, so long as they have an Internet connection. Now it also works with Tiger and Macintels For Mac OS X Leopard : Please check out the new MailServe for Leopard. (If you are upgrading to Leopard, instead of doing a fresh install, it'll help if you do a de-install of Postfix Enabler first in Tiger, by using the Red Cross.) 10.4.8 Update :If you're upgrading from a previous version of OS X to Tiger, use the Red Cross (at the top left hand corner of the window) to re-enable the Enable Postfix button. Clicking Enable Postfix now will force Postfix Enabler to make sure you've got everything needed to turn on Postfix. Note 1. Do not use this Mac OS X Hint about editing the /etc/sudoers file. It'll really mess up things up when you're using Postfix Enabler. Note : Some mail servers may reject mail coming from a dynamic IP address, on the (flawed) assumption that such mail must be from a spammer. But this is how I've set things up so that I can continue to send mail from anywhere I happen to be.
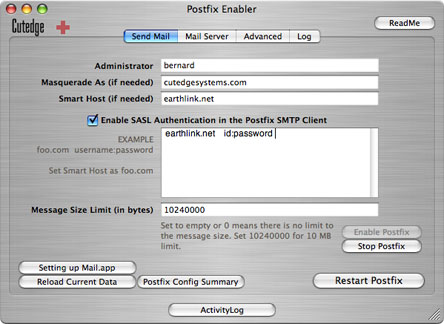
The One-Click Road Warrior's Guide Start up Postfix Enabler. Hit the Enable Postfix button. And that's it. This turns on the built-in SMTP server in Mac OS X and, in most cases, this would be it. You don't have to type in anything else and you can move on to the Setting Up Mail.app section. Problems? However, you may find yourself faced with a few more obstacles before you can send mail successfully. For example, you may find that the ISP of the network (that you're currently on) is blocking your ability to send mail, e.g., by blocking port 25, the smtp port. You can test this using Terminal. First, type in this command: telnet localhost 25 If you see a : Connected to localhost. it means Postfix Enabler has successfully set up your Mac to send mail. You can type 'quit' at this point to get out of the telnet session. Now, do a : telnet cutedgesystems.com 25 If you do not see the "ESMTP Postfix response" from the remote server, cutedgesystems.com, but instead the session times out, then you can deduce that the outgoing port is being blocked by the ISP. The first panel of Postfix Enabler gives you a few options to get around that. Using Panel 1 of Postfix Enabler - The Send Mail Tab If your ISP requires you to go through their mail server, enter their server name into the Smart Host field (otherwise leave it blank). Your built-in SMTP server will then contact this Smart Host and relay mail through it. In addition, if your ISP requires you authenticate against its SMTP server, you can use the Enable SASL Authentication check-box to turn on SMTP authentication. Enter the ISP's mail server address and your userID:password combination, as shown in the example below :
Finally, if you want your message to look like it's being sent from a particular domain (and avoid the "May be forged" headers that some ISPs' servers tag onto it), enter that doman name into the Masquerade As field. The Masquerade As field is particularly important for PHP programmers using PHP's built-in mail function. Enter a doman name into the Masquerade As field that corresponds to to the e-mail address that you want all replies to come back to, and you will find that your messages will get to their destination safely from the PHP scripts. Without this, the messages will get rejected. Please note that the Masquerade As field and the Domain Name field in Panel 2 are mutually exclusive. If you are running a full-fledged mail server, do not use the Masquerade As field. The last field on Panel 1 is the Message Size Limit. Set to 0 for no limit. After any of these changes, hit the Restart Postfix button for the changes to take affect. Benefits of having your own SMTP server For roving PowerBook users, this could sometimes be the only way you get to send mail. E.g., this is from someone who does the reality TV show, Survivor: "Thanx for a great program. I’m constantly traveling to different parts of the world doing TV productions. Sometimes we get an Internet connection at the location we are shooting at but no SMTP server to send mail. So Postfix Enabler has saved me many times by making it possible to send mail from remote locations." For PHP programmers, web designers, and other software developers, it's often useful to set up a local SMTP server on the development machine and communicate with it through "localhost". This is because you can let the local SMTP server do the job of communicating with a Smart Host, or set up the SSL connections, if required, or work with the DNS System, without your having to figure out what to do to effect these in your code. In your code, you simply talk to "localhost" and leave it to the Postfix Enabled-SMTP server to do the rest. This is how you set up Mail.app to talk to the local SMTP server.
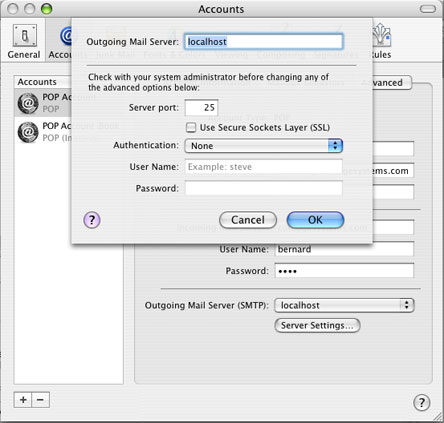
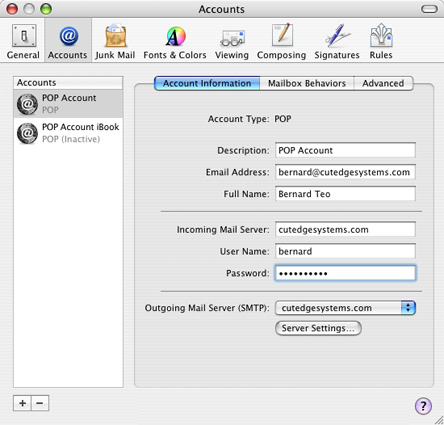
Set up the POP or IMAP account information the usual way, for the Incoming Mail Server. Set them to point to whichever mail server is providing the POP or IMAP services. You can use Postfix Enabler set up POP and IMAP services so you can become your own ISP - see the section on Panel 2 and 3 of Postfix Enabler, below. To use use your own built-in SMTP server, set the Outgoing Mail Server to localhost or 127.0.0.1, as shown above, and that's it. Make sure that the Authentication pop-up menu is set to none because you don't need to authenticate with your own built-in mail server. (... though the built-in mail server could, in turn, be made to authenticate with other mail servers, so it can relay mail out through them, as I had mentioned earlier.) If you use Eudora or Entourage, you can set them up in a similar way. In summary, this is what you're doing. You set up your POP or IMAP accounts so that replies coming back to you will reach you on your mail client. But the messages sent out your Mac via localhost will be despatched directly to the recipients. Note for PowerBook users : You may like to know if a large attachment has been sent out your machine, so you can close your PowerBook lid. Look into the Log Panel and check for a mail log entry that indicates Status=Sent for that particular message. Warning: If you're only going to send mail out and not trying to set up a full mail server (see next section), do not use the Mail Server Panel because the settings for the two situations are slightly different. Specifically, do not enter a domain name into the Mail Server Panel because it will cause Postfix to hold on to mail that are addressed to people on that domain, rather than sending them out. The One-Click Mail Administrator's Guide Postfix Enabler can be used to set up a fully functioning mail server, complete with POP3 and IMAP services. Workstations (which include PCs) on the local network can use this server to relay mail to each other, as well as to send them out to the rest of the world. This section describes how you would set this up.
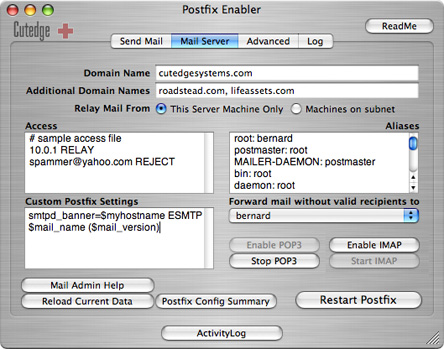
First, make sure that you have used the first panel (the "Send Mail" tab) to Enable Postfix and you have tried to send mail out successfully to another mail server. If not, please review the first section. Then, go to the second panel, the "Mail Server" tab. Make sure you have a valid domain name and that it is pointing correctly to your server machine. If it is, enter it into the domain name field. In the example above, my domain name is cutedgesystems.com. Once I've done this, I can click on Restart Postfix, and I've set up a mail server for the domain cutedgesystems.com that all machines on the same local network as the server can send mail through. Please note : When you're setting up a mail server that is accessible by the rest of the world, you must have a valid domain name. Check out this tutorial if you want to try this out using a free domain name. You need to check that the domain name works. The simplest way to do this is to turn on the web server on the same machine you are using to run your mail server (using OS X's Sharing Preferences). Then, fire up a web browser, like Safari, and see if you can hit the web pages that you know you have on this machine. Setting up POP3 and IMAP Services It's important to realise at this point that you need to set up user accounts on the mail server to collect (and act as diistribution points) for the in-coming mail. To create an account for a mail user, simply create a New User on that server machine using the System Preferences -> Accounts panel. Once you've created your user accounts on the server, you can choose between two different mechanisms that will allow your mail users to download their in-coming mail to whatever machine they happen to be using as their workstation. POP3 is a simple mechanism for transferring mail to a mail client software like Eudora, Mail.app, or Entourage. IMAP is a "smarter" system because you can use more than one machine to read your mail and the state of your mail box is synchronised across all these machines (in terms of the messages last read, state of drafts, etc.) You can set up both POP3 and IMAP services using Postfix Enabler and have both running at the same time, allowing your users to choose which service they prefer. So, next, you will need to enable either POP3 or IMAP services (or both) so that all the machines and users on your network can retrieve their incoming mail. Leave all the other settings alone, for the moment, and click on the Enable POP3 button or the Enable IMAP button, depending on which mode of mail service you prefer to run. Hit the Restart Postfix button. Check that it works Assuming that my domain name is cutedgesystems.com, this is how I'll set up the mail client, OS X's Mail.app, on each user's machine. Test it first on the local machine, i.e., the same machine you're using to run your server. The User Name and Password fields will correspond with the name and password of a user you had created using the Systems Preferences - Accounts Panel on the server machine. (If you've enabled the IMAP server, you can also use the Account Type: IMAP).
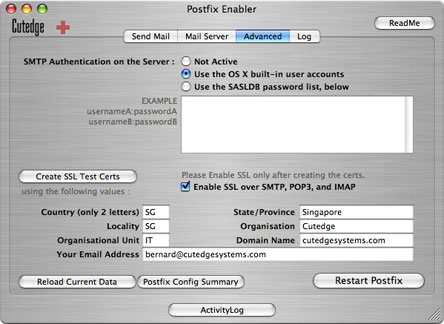
When you are ready, use Mail to send mail out to anybody you know and see if you can get a reply. The replies will come back to the same server. You can pick them up using Mail because Postfix Enabler has equipped your server with POP3 services. The next step is to share the mail server with all the other machines on your network. Share the Mail Server Via an Airport Base Station Mac users typically share an Internet connection in three ways. One way is to use an Airport Base Station to connect to the Internet and then share its connection. There's a tutorial (OS X, Broadband, and the Airport Base Station - but pay special attention to the section covering DNS) which will show you how to get a server running behind an Airport Base Station. In this case, if you've set up Mail for the other machines in the way shown above, you've really got nothing else to do. So long as you've got your DNS settings right (so that your other machines know where your mail server is), the other machines can now use your mail server to relay mail. Via Internet Sharing The second way to share an Internet connection is to turn on Internet Sharing on the mail server machine. If your mail server is equipped with an Airport card, this is really easy. The Airport card allows the server to create a secondary internal IP network which the rest of your machines can get up on, provided they're also equipped with Airport. In this case, besides setting Mail in the way shown above, you've also got one more thing to do on your server. By default, the Airport network created by the mail server will use a network in the range 10.0.2.x (please confirm that this is true before proceeding). Use Postfix Enabler, look for the Access field, and enter the following into a new line in the Access field : 10.0.2 OK This tells the mail server to allow all machines on the internal 10.0.2.x network to relay mail through the server. Via a Router The third way to share an Internet connection is via a router. The things you have to do here are a combination of steps from the first two methods described above. You have to enable port mapping on your router to make sure that ports 25 and 110 are mapped to the specific internal IP address you have reserved for your server (say, 192.168.2.18). Then, you have to ask Postfix to relay mail for your internal network, which should be 192.168.2, in the example above. Use Postfix Enabler, look for the Access field, and enter the following into a new line in the Access field: 192.168.2 OK This tells the mail server to allow all machines on the internal 192.168.2.x network to relay mail through the server. Please note : between the three ways, described above, for sharing an Internet connection, the ones with the router or Airport Base Station are the safer options. This is because you're situating the server on a private network behind the router or Base Station. Postfix is programmed, by default, to reject all attempts to relay mail through it by machines sitting outside its local network. In an Airport network, this network spans the private 10.0.1.x range. The mail server will relay mail only from its own 10.0.1.x network, rejecting all other attempts. The other way of sharing an Internet connection, through OS X Internet Sharing, though cheaper and more convenient, exposes your server to attempts to relay mail through it by other machines sitting on your ISP's network (because it is sitting directly on your ISP's network). In this latter case, you should use Postfix Enabler's Custom Postfix Settings field and add this one line : mynetworks_style = host To allow your other machines and users to route mail through this server, then, you should set up SMTP Authentication on the server - see Panel 3 of Postfix Enabler. Other uses for the Access field The Access field can be used to blacklist individual mail senders from sending mail to your site, or even entire domains. spammer@yahoo.com REJECT The Aliases Field Some required entries for Aliases are already created for you. Each site needs to have a Postmaster and a Root user so that other ISPs and you own system processes can contact a responsible person when they find problems with your system. MAILER-DAEMON is the conventional name attached to bounced messages. When senders find that their messages have bounced, they may need to contact someone for clarification. Their replies to their bounced messages will go to MAILER-DAEMON, so you need someone to pick these up. The first line in the example, below, shows that you can create e-mail groups quickly by entering a group name on the left-hand side of an Alias entry, and entering a series of user names, separated by commas, on the right-hand side, which can include users from other domains. nightrunner: haihwee,beekhim,brendan@sky.com The last line in the example, above, shows another way of creating e-mail groups - by pointiing the mail server to a file that contains a list of e-mail addresses, with one address on each line. Forward mail without valid recipients to - the Catch-All mailbox You can choose who, among your users, gets to be swamped by mail that has been sent to no one with that name on your server. If you elect not to nominate anyone, i.e., leave the pop-up menu for the catch-all mailbox blank, all messages for which there is no valid recipient will be bounced back to the sender. Actually, this is the suggested option, if you don't want to be swamped by junk mail. The Additional Domain Names Field If your server hosts more than one domain, you can list the additional domains in this field (separated by commas) so that Postfix knows that it has to accept messages sent to these domains. Make sure that these domain names work first and that they're also pointing correctly to your server machine. There is no separation between users into particular domains. A user may get mail addressed to any of the domains. E.g., on my server, mail sent to bernard@cutedgesystems.com and mail sent to bernard@roadstead.com will all reach me in my single mail box on the server. Relay Mail From - the server machine only or all machines on subnet This option allows you to prevent your Mac acting as an open relay if you've placed it directly on a broadband line. The default setting is to allow all machines on the same subnet as the server to relay mail through it without needing to authenticate, which is convenient for getting a shared server up quickly. But if you've placed the server directly on a broadband or dial-up line, then you will have all machines sitting on your ISP's network becoming your local network, inadvertently creating an open relay. Clicking on the "Relay Mail From : This server machine only" choice will close up the open relay. If you need to still allow mail relay from known users, turn on authentication. This will be the safest option. The Custom Postfix Settings field This is meant to allow experienced Postfix users to add their own modifications to the Postfix configuration that have not been taken care of by the Postfix Enabler user interface. These will stick in the Postfix config file at /etc/postfix/main.cf and will not be over-written when you do a Restart Postfix from Postfix Enabler. (In this way, Postfix Enabler works a little better than OS X Server's Mail Admin tool). Addtional Note for Outbound Mail If you're running a mail server and your ISP requires you to go through their mail server for outbound mail, enter their server name into the Smart Host field (otherwise leave it blank) on the Send Mail panel. In addition, if your ISP requires that you authenticate against its SMTP server, turn on SASL authentication and enter the ISP's mail server address and your userID:password combination into the relevant fields on the Send Mail panel. Also, if your ISP requires that the authentication be done in SSL, you're all set to go by turning on SSL mode in Panel 3 of Postfix Enabler, below. The Postfix Enabler Advanced Tab This allows the administrator to turn on SMTP-AUTH for the mail server. It allows the mail server to be accessed remotely by authorised users, whose name:password combinations have been registered with the server. The Advanced tab also allows the mail administrator to quickly create self-signed SSL certs for testing secured connections to and from the mail server.
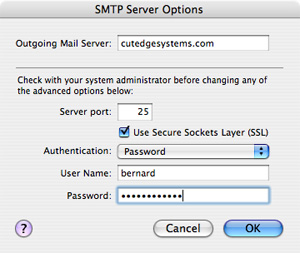
If you need to turn on SMTP Authentication, you have two choices - use the built-in OS X user accounts or SASLDB. The first method is so simple to use. It authenticates against the Mac's built-in user account management - so you maintain just one set of passwords, using System Preferences. Turn it on and you're done. (But the downside is that passwords are sent in the clear, unless you turn on SSL encryption, as shown below and explained in the SSL section.) In Mail.app, under Outgoing Mail Server, click on Server Settings, and set up the SMTP Server Options, as shown below. You need to make sure you enter the same User Name and Password combination that you gave to this user, using the server's OS X System Preferences panel :
SASLDB is considered to be more secure because passwords are never sent down the wire, only tokens. If you choose to turn on SMTP Authentication via SASLDB, you will need to provide the server with a list of username:password combinations, for each user who will be needing to send mail remotely through the server. Please note that SASLDB support in Panther broke when 10.3.9 came out. This will now only work on Tiger. Please upgrade to TIger if you need this feature. Then, in Mail.app, under Outgoing Mail Server, click on Server Settings, and set up the SMTP Server Options, as shown below. That is, set Authentication to "MD5 Challenge-Response".Then enter the username:password combination that was registered for this user on the server, using Postfix Enabler's Advanced Pane.
You can use the Advanced Panel to turn on or off SSL mode to encrypt the communications between client and server, over SMTP, POP, and IMAP. However, you will need to have the appropriate SSL certs in /System/Library/OpenSSL/certs before you can enable SSL. You can use this panel to create test (self-signed) certs to test the SSL connection to and from the mail server. You can always replace them with "real" certs, of the same name, in the future.
If you're testing the SSL connection, make sure you quit Mail.app and come back in again, when you switch the server from non-SSL to SSL mode. This is important, and had been the source of quite a few support calls. Mail.app seems to cache the information it keeps about a connection. If you switch modes, in mid-stream, it may get confused and you will see a connection error until you quit Mail.app and come back in. Also, if you're using the self-signed test certs, you will see the following dialog box thrown up by Mail.app, when you first send mail over SSL :
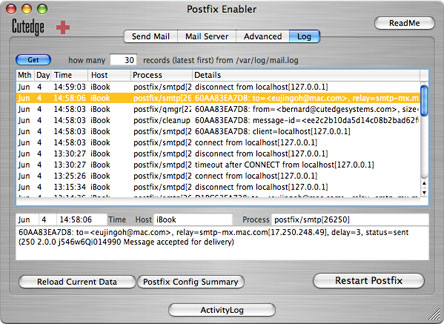
This is OK. It shows that the SSL mode is working. The cert used is a self-signed cert that hasn't been verified by any of the known certification services, e.g., Verisign. The cert can still be used to enable SSL encryption between client/server communications. If you click on "Show Certificate", it will show you the data you have set for this certificate (if you've updated the Country/State/Locality fields before clicking on the "Create SSL Test Certs" button. You can always replace the test certs with "real" certs of the same name. They are stored in /System//Library/OpenSSL/certs. You can use this panel to monitor the mail log. The Get button retrieves the last 30 (or so) records from the tail-end of the mail log, in reverse order. Because the table does not have enough width to show all the details of the connection, you can click on any line and the information will be re-displayed in the detail-fields below the table.
The mail log can be used to check if a large attachment has been sent out the mail server, as in the case of a PowerBook user. Look into the mail log for a Status=Sent indicator for the specific message and destination. There is also a Postfix Config Summary button at the bottom of the panel. When clicked it will show a summary of the active Postfix Configuration Parameters. If you know enough Postfix, this is useful for checking if the system is set up the way the GUI says it has been set up. Note that you can print out both the mail log and the Postfix configuration summary. (Actually, you can print any piece of information by just clicking on it, to give it the focus, before doing a Print from the File menu.)
The Mail Server and the OS X Firewall You should check your mail server machine to see if you have OS X's built-in firewall turned on. If so, you should learn how to set it so that information could still pass through to your mail server. Look here to see how this is done. In summary, you should open, at least, ports 25 (smtp), 110 (pop3) and 143 (imap) in the firewall. If you've turned on SSL, you should also make sure ports 995 (pop3 over SSL) and 993 (imap over SSL) are opened. Release Log 1.0. 27th October 2003. Postfix Enabler 1.0 released without POP server. 1.0.1 2nd November 2003. Released with a POP server. 1.0.2 4th November 2003. Added ability to re-enable the Enabler, in case new system updates overwrites the current configuration. 1.0.3 6th November 2003. Made sending mail and administering a mail server into two distinct pieces, so it's clearer you can use just the first part without using the other. Also, the configuration for a mail server is slightly different from one that would only support outgoing mail.Made the changes to reflect that. Finally, the system should now work for Macs that have been upgraded to Panther, rather than via a clean install. 1.0.4 16th November 2003. Includes both an IMAP and a POP3 server from the UW-IMAP project, with permission. Both modes of operation support SSL. Added the UW-IMAP license agreement into the user interface, so that the user has to agree with the disclaimers before installing the POP3 and IMAP binaries. 1.0.5 30th December 2003. An Admin Password is requested only once, on startup. Added ability to enable SASL Authentication for the Postfix SMTP client and server. Users can now create SSL test certs from within Postifx Enabler with just 1 click. Added ability to set Message Size Limit. 1.0.6 1st January 2004. There is one bug fix. The "auxprop_plugin" line in /usr/lib/sasl2/smtpd.conf should read "auxprop_plugin: sasldb" instead of sasldb2. This prevented SASL Authentication for the server from working properly. 1.0.7 6th January 2004. Added the ability to authenticate the in-coming SMTP connection against the built-in OS X user accounts which, unlike SASLDB, does not require the user to maintain a separate password database. This solution was contributed by Andy Black. Also, thanks to Eric Kuo, we now also have a Traditional Chinese interface. 1.0.8 9th January 2004. Added the ability to turn on or off SSL mode. 1.0.9 15th January 2004. Added the ability to look into the mail log, get a summary of the active Postfix configuration, and append custom Postfix parameters to that provided by the user interface 1.0.10 2nd November 2004. Updated the POP3 and IMAP binaries with the latest from 2004 UW/IMAP release. Made one important oft-requested change to where IMAP stores its mailboxes, so that it will work nicely with Mail.app. They're now stored at each user's ~/Library/Mail/IMAP folder on the server. 1.1 29th April 2005. The first version compatible with OS X Tiger 10.4. Rewrote everything in Objective-C. Window is now re-sizeable. 1.1.1 30th April 2005. The release version of OS X Tiger is missing some of the things essential for running Postfix. This version helps to put them back. 1.1.2 12th May 2005. SMTP Authentication via SASLDB broke in Tiger. This release fixes it. It also contains an updated French translation from Michel Pansanel from http://www.carpo.org. Thanks, Michel. 1.1.3 13th May 2005. This version will work also on systems that have been formatted case-sensitive - i.e., as Mac OS X Extended (case sensitive). 1.1.4 15th May 2005. This version accepts admin passwords containing diacriticals like accents and umlauts. 1.1.5 17th May 2005. Compatibility fix. An interim solution to the problem of POP and IMAP not starting up after a reboot on systems that have the Tiger 10.4.1 update. 1.1.6 24th May 2005. Conforms to Tiger's new way of launching system services, using launchd. Use the Red Cross (in the top left hand corner of the Postfix Enabler window) to re-enable the Enable Postfix button. Clicking Enable Postfix now will shift you over to launchd. POP and IMAP services launch more reliably now even on 10.4.1.(Will continue to launch services in the "old" way on Panther). This release also fixes the problem where a PowerBook refuses to go to sleep when running Postfix. Also, the serial number field is now more forgiving of leading and trailing spaces. 1.2 15th March 2006. This is a Universal Binary release. The application and the included POP and IMAP binaries, as well as the saslpasswd2 tool needed for sasldb password authentication, are now all Universal Binaries. (If you are running Potfix Enabler on an Intel Mac, just use the Red Cross to re-enable the Enable buttons and you will be able to replace the current POP and IMAP executables with Universal Binaries.) Also, new in 1.2, is support for using the Keychain to store the admin password and log into Postfix Enabler automatically. 1.2.1 20th April 2006. This release adds a Japanese localisation, originally undertaken by Chiang Hai Hwee, with a lot of help from Takashi Yoshida (thanks Takashi, always in your debt), and also to Makoto Imai for the suggestions for improvement and encouragement. 1.2.2 5th May 2006. Added a radio button (the Relay Mail button in the Mail Server panel) for the user to make sure that the server is not acting as an Open Relay when it's placed directly on a broadband line, as opposed to being behind a router or Airport Base Station. |
We build commercial-quality software at shareware prices. Please support our work by purchasing a serial number before downloading Postfix Enabler.
PayPal will accept all credit cards. But, if you're already a PayPal user and yet elect to pay by credit card, you'll need to use an alternate email address that isn't linked to your PayPal account. The serial number will be displayed in the browser after payment is completed, and also sent via email. Download : PostfixEnabler.zip Postfix Enabler and the included POP and IMAP executables are now all Universal Binaries. The latest version is 1.2.2 Read the User Reviews ...
Spanish - Pablo Rodriguez German - Stefan Hartmann Danish - Sebastian Adorján Dyhr French - Michel Poulain, for the original attempt, Michel Pansanel for most of the versions, and Joselyne Rochaud and Corentin Cras-Méneur for updating version 1.2.2. Italian - Joram (mugroma.org) Traditional Chinese - Eric Kuo Simplified Chinese - Hai Hwee, based on Eric Kuo's Traditional Chinese localisation Japanese - with help from Hai Hwee, Takashi Yoshida, and Makoto Imai Thanks to all of you. |
||