| Mac@Work The Ultimate Business Machine "Simple things should be simple. Complex things should be possible." remembering Alan Kay Contact Bernard Teo
|
Sendmail Enabler What is Sendmail Enabler? It can help you turn on OS X's built-in mail server with just one click. Note: Sendmail Enabler helps you configure sendmail faster than you can do by hand. But it may get confused by systems with earlier modifications (from previous attempts to install sendmail). Also, if you're trying to run a mail server, remember that you've still got to get the rest of the stuff correct - DNS, router, firewall, port mapping, to name a few. So, it doesn't always work. Requirements. OS X 10.2.x. Doesn't work on OS X Server. Important Notice: Sendmail Enabler does not work on Panther because Panther doesn't contain sendmail. It has Postfix in place of sendmail. You should use Postfix Enabler, instead. Latest version 1.1.3 (see release notes, below).
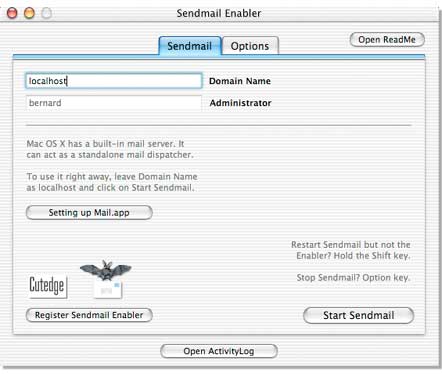
What does this mean? And how do you use it? OS X includes a popular Open Source mail server called sendmail. Until now, sendmail has been a pain to set up and much of its power lies unused. Sendmail Enabler does the necessary Unix incantations so that this power can be released. It's sendmail for the rest of us. If you travel often, you can use Sendmail Enabler to set up your PowerBook so that you can send mail wherever you are and whenever you want. In effect, your PowerBook becomes your very own roving SMTP server. (See the One-Click Road Warrior's Guide). If you run a small business, or a home office, or you just want to do it for fun, you can set up a fully functioning mail server that is equal in power to those running in most large corporations - because you will be running the same software: sendmail. The only difference is: on Mac OS X, you can configure it and get it running in less than a minute, using Sendmail Enabler. (See the One-Click Mail Administrator Guide). Moreover, if more people have sendmail enabled on their PowerBooks, it will mean less need for mail servers to support roaming users. While these people will still be able to retrieve their inbound mail from the central server, there will be virtually no need to relay outbound traffic on their behalf - because they can do it all on their own. So you can shut down the relay entirely, removing the holes that potentially allow spammers to steal your bandwidth. The One-Click Road Warrior's Guide To turn on the ability to send mail out directly from your PowerBook, start up Sendmail Enabler, keep to the first pane, leave domain name set as localhost and click on the Start Sendmail button. And that's it. Once Sendmail Enabler is done (in less than a minute), open up OS X's Mail application, and set up your mail user account as shown below :
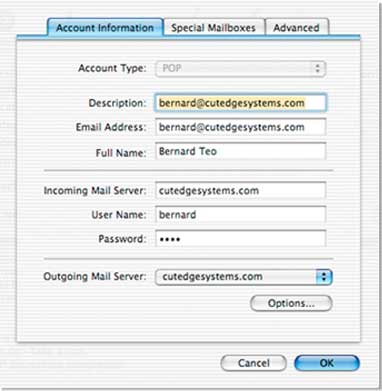
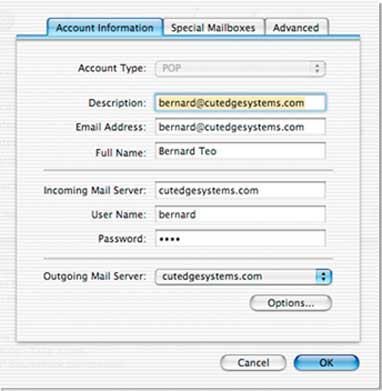
Basically, you're still going to use whichever mail server you were using that held your in-coming mail. So the Email Address, Incoming Mail Server, User Name, and Password should all be set to whatever is required by that mail server. In the example above, cutedgesystems.com holds my incoming mail. For your case, it could be the POP server account you were given by your ISP. The only change you need to make is to the Outgoing Mail Server name. Set it as localhost. If you can't find it in the drop-down menu, click on the "Options" button and enter it yourself. And that's it. By setting up your mail account this way, you ensure that replies will still get back to you via your central mail server. And you can pick them up later using Mail. But the messages sent from your PowerBook will be despatched directly to the recipients. This is how you use the account in Mail :
Caveats : You may be on a network whose ISP blocks the use of port 25. In this case, you would not be able to send mail out. Also, some mail servers are picky about receiving mail from a server with a dynamic IP address, or from a server without a domain name. In the latter case, you can enter your In-coming Mail Server's domain name into the Masquerade_As field in the Options Panel to improve your chances of not having your mail rejected. Sometimes, sendmail may just stop listening when you move around and your PowerBook's IP address changes. This seems to be a sendmail "feature". There are a variety of hacks (that may or may not work) to get around this but, for now, just Shift-Click on the Start Sendmail button to give sendmail a quick wake-up call (without re-running all the configuration scripts). To stop sendmail entirely, please Option-Click on the same button. Note : There are two sendmail problems I have yet to find solutions for. (1) Sendmail stops listening when the IP addresses changes as decribed above. This also affects the use of sendmail as a mail server (next section) and hits those people running the server off a dynamic IP address. (2) Sendmail needs a restart every time the Mac boots up. This hits some Macs but not all, so it's not consistent. I've searched the web for solutions. If I can find the answer, it'll get into the next release, for sure. But, for now, the latter problem can be solved by an AppleScript that restarts sendmail a second time after you reboot. You place this AppleScript among your Login Items in System Preferences. You need to edit the script first, to put in your admin password. Thanks, Seth Matheson, for the script. You can find it here. The One-Click Mail Administrator's Guide Sendmail Enabler can be used to set up a fully functioning mail server, complete with POP3 services. Workstations (which include PCs) on the local network (which includes Airport) can use this server to relay mail to each other, as well as to send them out to the rest of the world. Users on the move with PowerBooks can also use this server to collect their mail. This section describes how you would set this up.
The quickest way to set up the mail server is to give it a domain name and enter this into the domain name field. In the example above, my domain name is cutedgesystems.com. Please note : When you're setting up a mail server that is accessible by the rest of the world, you must have a valid functioning domain name. Check out this tutorial if you want to try this out using a free domain name. Another note: You need to check that the domain name works. The simplest way to do this is to turn on the web server on the same machine you are using to run your mail server (using OS X's Sharing Preferences). Then, fire up a web browser, like Safari, and see if you can hit the web pages that you know you have on this machine. Next, leave all the other settings alone and click on the Start Sendmail button. In less than a minute I have a fully functioning mail server. Check that it works Try to send mail out using OS X Mail running on the same mail server machine. Set up Mail, as shown below. Substitute cutedgesystems.com with yourDomain.com. The User Name and Password fields will correspond with your name and password on this OS X machine or the name and password of a user you had created using the Accounts Pane in this machine's Systems Preferences.
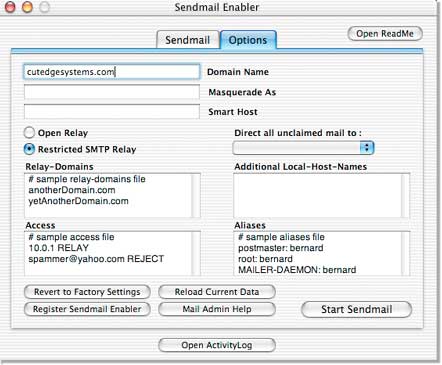
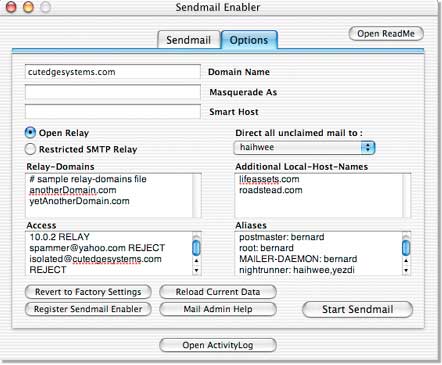
When you are ready, use Mail to send mail out to anybody you know and see if you can get a reply. The replies will come back to the same server. You can pick them up using Mail because Sendmail Enabler has equipped your server with a POP3 services. The next step is to share the mail server with all the other machines on your network. Share the Mail Server Via an Airport Base Station Mac users typically share an Internet connection in three ways. One way is to use an Airport Base Station to connect to the Internet and then share its connection. There's a tutorial (OS X, Broadband, and the Airport Base Station - but pay special attention to the section covering DNS) which will show you how to get a server running behind an Airport Base Station. In this case, if you've set up Mail for the other machines in the way shown above, you've really got nothing else to do. So long as you've got your DNS settings right (so that your other machines know where your mail server is), the other machines can now use your mail server to relay mail. Via Internet Sharing The second way to share an Internet connection is to turn on Internet Sharing on the mail server machine. If your mail server is equipped with an Airport card, this is really easy. The Airport card allows the server to create a secondary internal IP network which the rest of your machines can get up on, provided they're also equipped with Airport. In this case, besides setting Mail in the way shown above, you've also got one more thing to do on your server. By default, the Airport network created by the mail server will use a network in the range 10.0.2.x (please confirm that this is true before proceeding). Use Sendmail Enabler, look for the Access field, and enter the following into a new line in the Access field : 10.0.2 RELAY This tells the mail server to allow all machines on the internal 10.0.2.x network to relay mail through the server. Via a Router The third way to share an Internet connection is via a router. The things you have to do here are a combination of steps from the first two methods described above. You have to enable port mapping on your router to make sure that ports 25 and 110 are mapped to the specific internal IP address you have reserved for your server (say, 192.168.2.18). Then, you have to ask sendmail to relay mail for your internal network. So, you've got this thing to do on your server. Use Sendmail Enabler, look for the Access field, and enter the following into a new line in the Access field: 192.168.2 RELAY This tells the mail server to allow all machines on the internal 192.168.2.x network to relay mail through the server. Please note : between the three ways, described above, for sharing an Internet connection, the ones with the router or Airport Base Station are the safer options. This is because you're situating the server on a private network behind the router or Base Station. Sendmail is programmed, by default, to reject all attempts to relay mail through it by machines sitting outside its local network. In an Airport network, this network spans the private 10.0.1.x range. The mail server will relay mail only from its own 10.0.1.x network, rejecting all other attempts. The other way of sharing an Internet connection, through OS X Internet Sharing, though cheaper and more convenient, exposes your server to attempts to relay mail through it by other machines sitting on your ISP's network (because it is sitting directly on your ISP's network). Another note : if you're running a server off a dynamic IP address, sendmail may stop listening when its IP address changes. You don't get this problem when you're serving behind a router or Aiport Base Station because the server's IP address remains fixed at 10.0.1.201, say, no matter how often the external IP address changes. So, another reason to put the server on an internal private network. Other uses for the Access field The Access field can be used to blacklist individual mail senders from sending mail to your site, or even entire domains. It can also be used to block an internal user from receiving mail (see the third line below, but of course we're not the Thought Police). spammer@yahoo.com REJECT The Aliases Field Three required entries for Aliases are already created for you. Each site needs to have a Postmaster and a Root user so that other ISPs and you own system processes can contact a responsible person when they find problems with your system. MAILER-DAEMON is the conventional name attached to bounced messages. When senders find that their messages have bounced, they may need to contact someone for clarification. Their replies to their bounced messages will go to MAILER-DAEMON, so you need someone to pick these up. postmaster: bernard The last line in the example, above, shows that you can create e-mail groups quickly by entering a group name on the left-hand side of an Alias entry, and entering a series of user names, separated by commas, on the right-hand side, which can include users from other domains. Unclaimed mail You can choose who, among your users, gets to be swamped by unclaimed mail. If you elect not to nominate anyone, all messages for which there is no known recipient will be bounced back to the sender. The Additional Local-Host-Names Field If your server hosts more than one domain, you can list the additional domains in this field so that sendmail knows that it has to accept messages sent to these domains. The Masquerade_As Field If your server hosts several domains concurrently and you want all outgoing mail to look like they came from only one domain, you can enter its name into the Masquerade_As field. The Masquerade_As field is also useful for people who are doing web applications development, e.g., in PHP. They can leave the server's name set as localhost, and enter the domain they are developing the application for into the Masquerade_As field, and they're set. Smart Host This is the name of your ISP's SMTP server if that's the only way your ISP (e.g., earthlink.net) will allow you send mail out their network. Leave it blank, if you have no need for this. Open and Restricted Relays and the Relay-Domains field The system is set to Restricted SMTP Relay, by default, and there should be no need to change this. With Sendmail Enabler, mobile users can always send mail out on their own. It's usually the errors made while setting up the Relay-Domains field that create the holes exploited by the spammers. Relay-Domains are the domains and networks from which you will accept mail for relaying through your network. For example, you may have a team of people working at a customer site. You may want to enter the domain name of the customer site into the Relay-Domains field so that your people can continue to send mail out the home server. However, this means that everyone on that site will be allowed to send mail out. You may not want this to happen but it's hard to work this down to specific IP addresses. An Example of a Custom Setup This shows you how the Sendmail Enabler's Options Panel will look after making the changes described above. You must click on the Start Sendmail button to effect the changes.
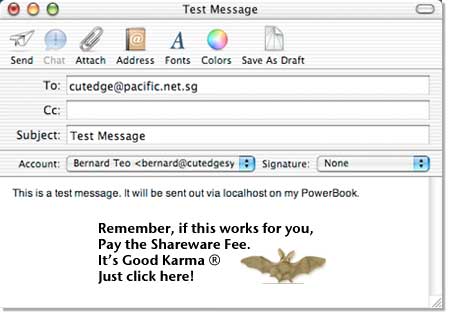
A reminder. Sendmail Enabler is Shareware, not freeware. If this has helped you, please pay the shareware fee of $9.95. Keep the karma flowing. Just click on the bat, below.
Need more help with Spam Control? To learn more about the options you can make, click here. It will take you to the Sendmail.org site. Have fun trying out different options. The Sendmail Enabler Buttons Don't worry about making mistakes. You can "Revert to Factory Settings", which should always work. The "Reload Current Data" button shows you the settings that are currently applied. The Mail Server and the OS X Firewall You should check your mail server machine to see if you have OS X's built-in firewall turned on. If so, you should learn how to set it so that information could still pass through to your mail server. Look here to see how this is done. Change Log 1.00. 14th March 2003. Sendmail Enabler released. At this point, it required the Developer Tools CD to have been installed. 1.01. 31st March 2003. Developer Tools CD no longer needs to have been installed, though it's still better to have done that. 1.02. 12th April 2003. Sendmail Enabler 1.02 now sports a tabbed interface. Added support for Airport Base Station networks. A new tab allows you to activate DNS services on your designated server. Necessary to run any sort of server functions (web, mail, etc...) behind an Airport Base Station. The server needs to be given a static local IP address (say, 10.0.1.201). The Airport Base Station assigns IP addresses dynamically for the range 10.0.1.2 to 10.0.1.200. The Airport Base Station itself is on 10.0.1.1. 1.03. 14th April 2003. Sendmail Enabler 1.03 now allows you to deactivate the services you've enabled using Sendmail Enabler. Just hold down the Option key when you're clicking the "Start" button and it'll turn into the "Stop" button. 1.04. 24th April 2003. Sendmail Enabler 1.04 now allows you to activate the PHP module for the OS X built-in web server, if it is not already turned on. Also allows you test for PHP by typing "localhost/phpinfo.php" into your web browser. 1.1. 10th July 2003. Sendmail Enabler 1.1 introduces the Sendmail Options Panel. Allows you to choose between Open Relay and Restricted SMTP Relay. Also allows users to create blacklists and aliases. (Released on 15th July 2003 on MacUpdate). 1.1.1. 17th July 2003. Fixed a user-interface bug when the ability to specify multiple domain-names was introduced. Also, the archive is now in a more compatible Stuffit format. 1.1.2. 9th August 2003. Spun off Sendmail Enabler into a program on its own so it'll be easier to add new features. (The DNS tab will re-appear as DNS Enabler). Added support for Smart Host, plus the ability to choose which user will receive unclaimed mail, plus the abilty to restart sendmail without re-running the configurator script. Made some improvements to the documentation. Sendmail Enabler is now Shareware. Version 1.1.3 Release Notes 1.1.3. 15th August 2003. Added support for sendmail's Masquerade feature. Also, it now takes a look at sendmail's queues before it starts up sendmail. If necessary, it will create the queues and set their permissions correctly. |
Reviews :
Download SendmailEnabler.hqx Download SendmailEnabler.zip 
Sendmail Enabler is Shareware. It's the ultimate money back guarantee. If it doesn't work for you, you don't have to pay a cent. But if it does, please pay the shareware fee of $9.95. It's worth every cent for the time you save. References :
Acknowledgments :
|
||